How to Use Cake Stencils on Buttercream & Fondant (Without Smudging)
Table of Contents
You’ve found a beautiful cake stencil, chosen your colours and prepared your cake. Everything looks promising—until you lift the stencil and discover blurred lines, missing details or icing stuck to the back.
Sound familiar?
Learning how to use cake stencils is less about having a perfectly steady hand and more about understanding your cake’s surface, choosing the right decorating medium and applying it with the right pressure.
Whether you’re decorating a birthday cake at home or preparing elegant designs for customer orders, this guide will show you how to stencil on buttercream and fondant, work with delicate mesh patterns and fix common mistakes before they spoil your finish.
How to Use Cake Stencils: The Quick Answer
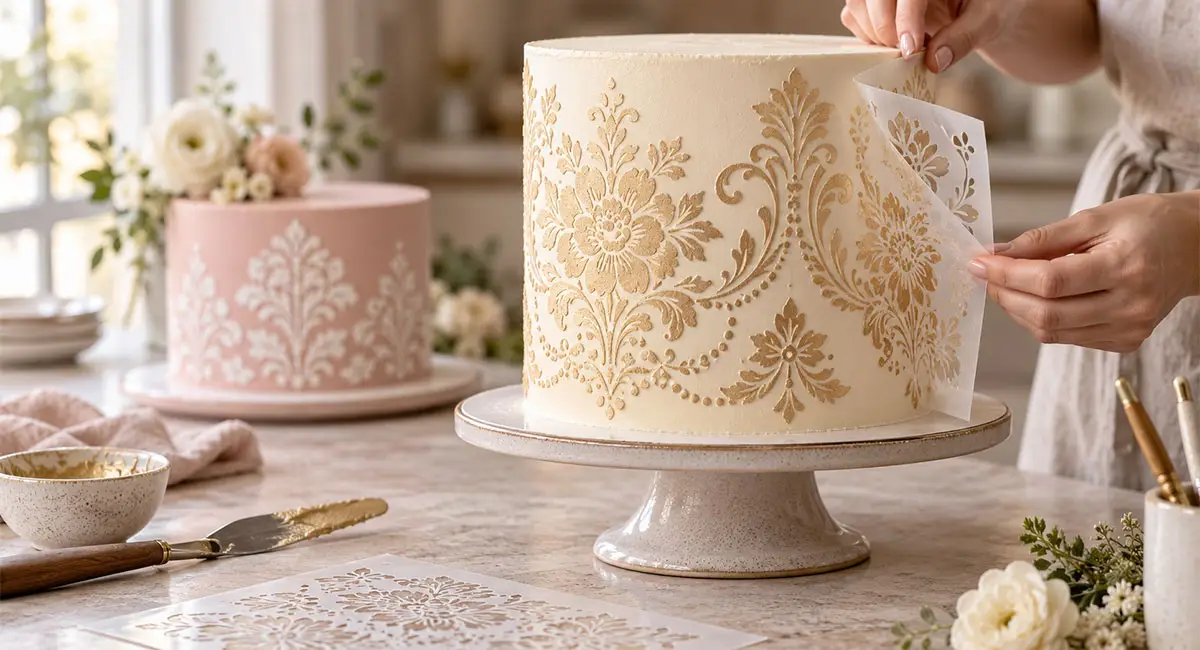
To stencil a cake, start with a smooth, properly set buttercream or fondant surface. Position a clean stencil securely against the cake, apply a thin layer of compatible icing using gentle, even pressure, and carefully peel the stencil away while the applied icing is still workable. Allow the finished pattern to set before moving on to another section.
The secret to cleaner designs is the right combination of surface firmness, icing consistency and stencil stability.
For detailed mesh stencils, the decorating mixture must also be suitable for passing through the fine mesh openings.
Before You Start: Choose the Right Stencil and Icing
Not every cake stencil works the same way, and not every icing behaves the same way under a stencil.
Choosing a suitable combination before you begin can save time, ingredients and a frustrating last-minute decorating rescue.
Mesh Cake Stencils vs Traditional Cake Stencils
Traditional cake stencils are commonly made from thin, flexible plastic with cut-out shapes. Buttercream, royal icing or other compatible decorating mediums are applied through those openings to create a pattern.
Mesh cake stencils work differently. They’re made from finely woven material with patterned openings that allow suitable decorating mixtures to transfer through the mesh.
Their flexible construction can make them useful for detailed designs around curved cake surfaces, including fine lace, botanical motifs and intricate geometric patterns.
However, the fine openings require particular attention to consistency. A mixture that’s too thick may not transfer properly, while one that’s too fluid can spread beyond the intended design.
If you’re drawn to delicate floral or lace-inspired finishes, explore Makia’s collection of mesh cake stencils and decorating tools for patterns suited to your creative style.
Which Icing Works Best for Cake Stencilling?
The best decorating medium depends on both the stencil and the cake covering.
| Cake surface | Decorating medium | What to consider |
|---|---|---|
| Firm, chilled American buttercream | Coloured buttercream | Adjust consistency to suit the stencil openings |
| Chilled Swiss meringue buttercream | Compatible coloured buttercream or a suitable edible colour technique | Work carefully on a firm surface and test first |
| Dry, set fondant | Royal icing | Adjust thickness to the stencil design and allow the pattern to dry |
| Firm ganache | Compatible decorating medium | Test adhesion and surface stability before decorating |
For example, a plastic stencil with relatively open cut-outs may work well with spreadable icing, while a fine mesh design might require a softer, smoother mixture to transfer its delicate details.
There isn’t one universal icing consistency that works for every stencil.
Try a small test first. A spare fondant panel or a chilled board coated with your chosen buttercream can help you check the mixture before working on your finished cake.
What You’ll Need for Cake Stencilling
You don’t need a cupboard full of specialist equipment to get started.
A few well-chosen tools and a properly prepared cake will make the process much easier.
Your basic cake stencilling setup includes:
- A clean cake stencil suitable for your chosen design
- A smoothly covered buttercream or fondant cake
- A compatible decorating mixture in your preferred colour
- A small offset spatula or flexible silicone spatula
- A cake scraper for removing excess icing
- A stable cake turntable or work surface
- A clean cloth and suitable cleaning supplies for the stencil
A flexible spatula is particularly helpful when working with fine mesh because it allows you to spread a small amount of mixture with controlled pressure.
Have everything ready before removing a chilled cake from the fridge. In warmer Australian kitchens, keeping your buttercream firm while you work can make a noticeable difference.
How to Use Cake Stencils on Buttercream: Step by Step
Buttercream stencilling is a lovely way to add texture and colour without piping every detail by hand.
From subtle tone-on-tone patterns to striking contrasting designs, the technique offers plenty of creative possibilities.
Here’s how to approach it.
Step 1: Prepare and Chill Your Buttercream Cake
Begin with a properly crumb-coated cake and a smooth final layer of buttercream.
Use a cake scraper to even out the sides and remove visible ridges or air pockets. The smoother the surface, the easier it is for your stencil to sit evenly against the cake.
Next, refrigerate the cake until the outer buttercream layer is firm enough to withstand gentle contact without denting or lifting.
Some buttercreams firm up quickly, while others need more time. The temperature of your kitchen and the composition of your icing will also affect the result.
Don’t rush this stage. A soft surface can stick to the stencil, making an otherwise beautiful pattern difficult to release.
Step 2: Position the Stencil Securely
Place your chilled cake on a stable, non-slip turntable.
Gently position the stencil against the surface, making sure it’s straight and sits as closely as possible to the cake without distorting the buttercream underneath.
If you’re decorating the sides, check the alignment before applying any icing.
With a flexible mesh stencil, avoid stretching the fabric or pulling too tightly. The goal is close, even contact—not excessive tension.
A second pair of hands can be helpful for larger designs, but smaller sections are often easier to manage when you’re learning.
Step 3: Apply Your Decorating Mixture
Prepare a small amount of coloured buttercream suitable for your stencil.
For fine mesh patterns, the mixture may need to be softer than ordinary piping buttercream to move through the tiny openings. It should still be controlled enough to avoid spreading under the design.
Take a little mixture on the tip of your spatula and apply it using gentle, steady movements.
Work methodically across the pattern rather than repeatedly spreading back and forth.
Once the design is covered, use your spatula or scraper to remove unnecessary excess.
A thin, controlled application is generally easier to manage than a heavy layer that needs repeated scraping.
Avoid pressing too hard, as this can push the stencil into the cake covering or force icing beyond the intended pattern.
Step 4: Carefully Remove the Stencil
This is the moment everyone looks forward to!
After transferring the design, gently lift one edge of the stencil and peel it away in a controlled motion.
Avoid dragging it sideways across the freshly decorated surface.
For icing-based stencil applications, removing the stencil while the applied mixture is still workable generally helps prevent the pattern from tearing as it separates.
The best movement will depend on the stencil’s flexibility, the cake’s shape and the decorating medium.
Once you’ve removed the stencil, resist the temptation to immediately smooth every tiny imperfection. Touching a fresh pattern can sometimes make a small mark much more noticeable.
Step 5: Allow the Design to Set Before Continuing
If you’re decorating a large cake or repeating a design around several sections, give the completed pattern time to become stable before moving on.
For buttercream designs, this may involve refrigerating the cake again until the surface firms up.
Clean and dry the stencil as appropriate before placing it against the next area.
Working in sections takes a little more planning, but it helps protect the decorations you’ve already completed.
And with every attempt, you’ll develop a better feel for the pressure and consistency that suit your preferred designs.
How to Use Cake Stencils on Fondant with Royal Icing
Fondant provides a different decorating surface from buttercream.
Its smooth finish can be particularly attractive for lace, geometric and ornamental stencil patterns, especially when the fondant has had sufficient time to set.
Royal icing is a popular option because it can create defined decorations that become firm as they dry.
Prepare a Smooth, Dry Fondant Surface
Cover your cake smoothly and allow the fondant surface to become suitably firm and dry before stencilling.
Freshly applied, soft fondant can be marked by pressure, and excess moisture may affect how the decorating mixture behaves.
Position the stencil carefully. If you use a temporary fixing method on fondant, test it first to ensure it won’t damage the covering or introduce unsuitable materials into the decoration.
For a visual demonstration of this technique, explore Queen Fine Foods’ cake stencilling tutorial, featuring cake decorator Sharon Wee and her step-by-step approach to applying royal icing designs on fondant.
Apply Royal Icing with Controlled Pressure
Prepare royal icing according to its instructions, then adjust the consistency for your particular stencil.
For traditional cut-out stencils, a thicker, spreadable royal icing may be suitable. Fine mesh designs can require a different consistency to transfer their intricate details.
Always test the mixture on a spare piece of fondant first.
Apply the icing evenly, remove excess with a scraper and carefully peel away the stencil while the icing is still workable.
Allow the finished design to dry before handling the area again.
Repeat the Pattern Without Damaging Earlier Details
When continuing around a cake, check that the previous royal icing section has set sufficiently before placing another stencil close to it.
Clean and dry your stencil between applications so leftover icing doesn’t transfer to the next section.
For intricate designs, working patiently in smaller sections usually offers more control than trying to decorate the entire cake at once.
Cake Stencilling Problems and How to Fix Them
Even experienced cake decorators occasionally encounter a stubborn stencil.
The good news? Many of the most common problems can be traced to surface preparation, icing consistency or application technique.
Use this quick troubleshooting guide to work out what might be happening.
| Problem | Possible cause | What to try |
|---|---|---|
| Icing bleeds underneath the stencil | Mixture too fluid, poor contact or excessive pressure | Adjust consistency, improve contact and apply more gently |
| Design lifts away with the stencil | Sticky surface or unsuitable release technique | Firm up the cake and peel away carefully |
| Stencil leaves marks in buttercream | Cake surface too soft or stencil pressed too hard | Chill until firm and reduce pressure |
| Pattern looks patchy | Mixture not transferring evenly through the openings | Test consistency and work in controlled sections |
| Repeating patterns don’t align | Starting position or spacing wasn’t planned | Mark a reference point and check alignment |
| Lustre dust looks clumpy | Too much powder, moisture or uneven application | Use a suitable edible product and test a lighter application |
Why Does Icing Bleed Under a Cake Stencil?
Bleeding occurs when the decorating mixture spreads beyond the intended pattern.
It can happen if the mixture is too fluid for the stencil, the cake surface is uneven or the stencil moves while you’re applying the icing.
Start by checking the consistency.
Then make sure the stencil sits close to the cake without large gaps. Use gentle, consistent pressure and avoid repeatedly pushing icing across the same area.
With very fine mesh designs, remember that you need a mixture that can pass through the openings without spreading uncontrollably.
Why Does Buttercream Peel Off When Removing the Stencil?
If the base buttercream comes away with the stencil, it may not have been firm enough before decorating.
Excessive pressure, a sticky decorating mixture or an unsuitable removal technique can also contribute.
Allow the base to firm up appropriately, apply the stencil with a lighter touch and remove it carefully rather than pulling or dragging it across the cake.
If the problem continues, try a small practice section with a different application consistency.
Why Does My Stencil Pattern Look Faint or Incomplete?
Sometimes the design transfers beautifully in one area but barely appears in another.
This may happen when the mixture doesn’t pass through fine mesh openings consistently, especially if it’s too stiff.
Uneven pressure can also leave parts of the design underfilled.
Before adding more icing, check your technique and perform another test on a practice surface.
A flexible spatula, a small amount of mixture and methodical movements can help you achieve more consistent coverage.
For subtle tone-on-tone designs, using a slightly darker or lighter version of the base colour can also make the pattern easier to see without changing the overall style.
How Do You Prevent Stencil Smudging?
Smudging often happens when the stencil shifts, the applied mixture is disturbed during removal or the previous section hasn’t set before the next application.
Keep the stencil stable while working, avoid unnecessary scraping and remove it in a controlled direction.
When repeating designs, allow each completed area to become stable before placing the stencil close to it again.
Most importantly, practise your chosen technique before decorating a cake for an important occasion.
How to Create Seamless Stencil Patterns Around a Cake
A repeating floral border or geometric pattern can look beautiful around a cake—but getting the beginning and end to meet neatly takes planning.
Start by measuring the cake’s circumference and comparing it with the width of your stencil’s repeat.
Choose a starting position at the back of the cake, where any unavoidable join will be less noticeable.
Before applying icing, check how the final section will line up with the first.
For flexible mesh stencils, avoid stretching the fabric to force a pattern into place. That can distort its shape.
After completing one section, allow it to set as needed, clean the stencil and carefully align the next repeat.
A little planning before the first application can save plenty of frustration when you reach the final section.
Creative Cake Stencil Ideas to Try
Once you’ve mastered the basics, cake stencilling becomes much more than a decorating technique. It’s another way to develop a style that’s distinctly yours.
Here are three creative directions worth exploring.
Botanical and Floral Cake Designs
Soft leaves, delicate flowers and natural patterns can bring a fresh, elegant feeling to celebration cakes.
For a garden-inspired design, try combining muted greens with ivory buttercream, or choose a contrasting botanical motif for a more contemporary look.
Makia’s Tropical Leaf Pattern Stencil Mesh offers a nature-inspired design worth exploring for botanical cake decorating.
Elegant Lace and Decorative Borders
Lace-inspired patterns can introduce delicate detailing to wedding cakes, engagement cakes and vintage-style creations.
Try a subtle white-on-white design for a restrained finish, or use a soft contrasting colour to make the ornamental pattern more visible.
These designs can be particularly appealing when you want visual detail without piping every decorative line individually.
Modern Geometric and Textured Cakes
Prefer a more architectural or minimalist look?
Geometric lines, waves and abstract textures can add movement and interest to a simple cake.
The Vertical Wave Pattern Stencil Mesh from Makia is one option to consider when experimenting with flowing, contemporary patterns.
For a striking finish, try contrasting a darker stencil colour against a pale cake covering—or reverse the combination for a different effect.
The most effective design isn’t necessarily the most complicated one. Sometimes a beautifully positioned pattern is all a cake needs.
How to Clean and Care for Cake Stencils
Delicate decorating tools deserve a little care, especially when you’re working with fine mesh openings.
Remove icing residue promptly before it hardens into the pattern.
Follow the manufacturer’s care instructions for your particular stencil. Gentle cleaning with suitable mild soapy water may be appropriate for delicate mesh, but always check the recommended method first.
Avoid aggressive scrubbing, excessive stretching or exposure to heat that could damage the material.
Allow the stencil to dry thoroughly before storing it flat or in a protective sleeve.
A clean, properly stored stencil is easier to work with and helps keep the next decorating session enjoyable.
Frequently Asked Questions About Cake Stencilling
Can you use cake stencils on buttercream?
Yes. Cake stencils can be used on suitable buttercream surfaces, particularly when the base is smooth and firm. The decorating mixture and application technique should match the type of buttercream and stencil you’re using. Fine mesh designs may need a different consistency from traditional plastic stencils.
What is the best icing to use with cake stencils?
There’s no single best icing for every situation. Buttercream is commonly used on buttercream-covered cakes, while royal icing is popular for stencilling on set fondant. The ideal consistency depends on the stencil openings, cake surface and desired effect.
Do cake stencils work on fondant?
Yes. Stencils can create detailed patterns on smooth, properly prepared fondant. Royal icing is one common decorating medium. Make sure the fondant is sufficiently set and test the icing consistency before applying it to your finished cake.
How do you stop cake stencil designs from smudging?
Keep the stencil stable, apply the decorating mixture with controlled pressure and remove the stencil carefully. Allow completed sections to set before repeating the pattern nearby. A smooth, firm cake surface is also important.
Should you remove a cake stencil before or after the icing sets?
For most icing-based stencilling techniques, the stencil is removed carefully while the newly applied icing is still workable. Waiting until the icing hardens around the stencil may damage the pattern during removal. Let the transferred design set before continuing with neighbouring sections.
Ready to Try Your Own Cake Stencil Design?
There’s something satisfying about lifting a stencil to reveal a beautiful pattern you created yourself.
Whether you’re planning a delicate floral birthday cake, an elegant wedding design or something bold and modern, the right stencil can help turn your decorating ideas into reality.
At Makia Pastry Tools, explore a growing collection of mesh cake stencils featuring botanical details, lace-inspired patterns and contemporary designs.
Find a pattern that suits your next project, practise your technique and enjoy the creative possibilities.
Explore Cake Stencils & Fondant Stamps at Makia — with delivery across Australia.